 July 6, 2023
 Are you eager to start your blog or website? Then you have landed at the perfect place today!!!
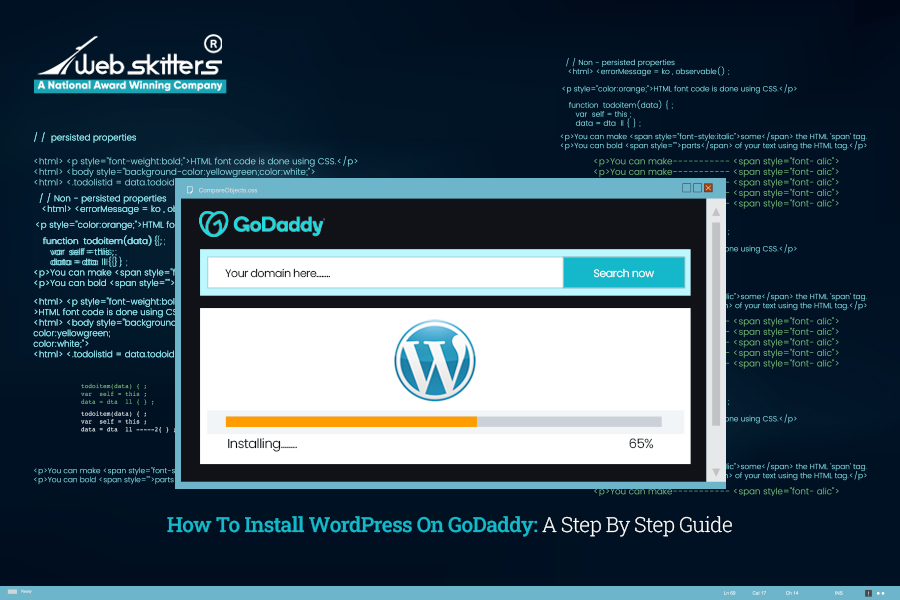
Installing WordPress on GoDaddy is a simple process allowing you to create a feature-rich and dynamic website without the need for extensive coding knowledge. GoDaddy, one of the most popular web hosting providers, offers a convenient one-click WordPress installation feature that makes setting up your website as easy as a breeze.
In this guide, we will walk you through the step-by-step process of installing WordPress on GoDaddy, enabling you to quickly get your website up and running.
We will also learn the important things to consider before starting the installation procedure as well as how to get SSL for free after installing WordPress.
Let’s dive in and kick-start the journey of adding one of the most popular CMS on this renowned web-hosting platform.
What Is A Domain Name And Hosting?
Most of us have heard about the term “Domain Name”, and “Hosting” but it’s unclear to many what they are!!! At its simplest level, we often use them regularly whenever we surf something on the internet.
In this section, we have explained them.
Read before you head on to how to install WordPress on GoDaddy …
A domain name is a string of text mapping to an alphanumeric IP address, used for accessing a website from client software. In simple English, a domain name is a text using typing, which in the browser window a user reaches a particular website. For instance, the domain name for Yahoo is www.yahoo.com.
There are two parts to a domain name – a Top Level Domain (TLD) and a Second-Level Domain (SLD). While the former comes at the end of domain names, the latter is the name just to the left side of the domain extension. Here for yahoo.com, the Second-Level Domain is Yahoo, and the Top-Level Domain is .com.
Domain names are managed by domain registries, which authorize the names of the registrars. If you want to create a new website, you ought to register the name with the registrar. At present, there are more than 300 million registered domain names.
Let’s now move on to Hosting…
Hosting or Web Hosting is a digital service that makes the content of your website accessible on the internet. Typically a hosting provider develops a specially designed backend computing infrastructure which in turn used by the web developer to host a website through uploaded source code. In this way, each website is individually identifiable by its distinctive domain name and rationally allocated web space and storage.
Web hosts provide the users like you with the hosting technology and resources they need to operate their websites effectively and securely. They are mainly responsible for ensuring your server is working properly, putting security measures to practice, and ensuring that data transfer to visitors’ browsers is happening successfully.
A web hosting service provider, for instance, GoDaddy, makes sure that your website performs optimally and with enhanced security protocols. Furthermore, it simplifies a range of critical aspects and challenges of web hosting – from complex software installation to technical support.
Instead of hosting your website on your personal, all you have to do is rent a space from the providers. This results in maximum reliability, speed, speed, security, and reliability for your website.
What Is GoDaddy Hosting & Why Choose Them?
Most small businesses across the world are great with GoDaddy when it comes to web hosting. But before that, it’s important to know what is that you are getting into and why it’s the right choice for you.
That being said, we will be exploring what is GoDaddy hosting and why you should install WordPress on GoDaddy before knowing how to install WordPress on GoDaddy.
GoDaddy is the world’s most trusted and largest domain registrar. It empowers people having creative ideas to succeed online. The services GoDaddy provides include its products – domains, and hosting.
You can select both of them from one platform and get them installed here. Purchasing a domain name is easy with GoDaddy’s domain search tool, and name generator tools. And your perfect website address for your business will be ready in just a few clicks.
This platform is best for first-time site builders who can manage GoDaddy well as a web host. You will get everything you require to start your journey with the low-tier plan for shared hosting, including a domain name, SSL certificate, and seamless site builder.
Being a professional web development service provider for over a decade now, we recommend GoDaddy because it gives you a good deal. But if you are someone, who needs more transparency, and free extras without dealing with upsell, GoDaddy is not the right option.
Not all web hosting platforms offer as many services as GoDaddy does. Plus, everybody can use it since it doesn’t require technical knowledge such as coding. To add WordPress to GoDaddy, there are only a few steps to follow.
Things You Should Know Before Installing WordPress On GoDaddy
Hosting WordPress on GoDaddy is something that can benefit your website or your new business to a great extent. There isn’t a single or linear path to get started with GoDaddy.
This installation provides you with a lot of scopes and has different stages from start to finish.
But before deep diving into how to install WordPress on GoDaddy hosting, there are a few things you need to know before the GoDaddy WordPress setup. Below, we have laid down some crucial points to consider:
1. Choose The Right Hosting Plan
GoDaddy offers various hosting plans, including shared hosting, managed WordPress hosting, and Virtual Private Servers (VPS).
For installing WordPress, the most suitable option is usually the managed WordPress housing plan, as it is specifically optimized for running the websites. This plan provides better performance, security, and automatic updates tailored for WordPress.
2. Check Out Requirements
WordPress has specific requirements that your hosting environment needs to meet. Before installing WordPress on GoDaddy, ensure that your hosting plan supports the necessary versions of PHP (7.4 or higher recommended) and MySQL (5.6 or higher recommended). GoDaddy’s managed WordPress hosting usually meets these requirements.
3. Domain Name And DNS
To Install WordPress, you will need a domain name registered with GoDaddy or any other registrar. If you are using a domain registered elsewhere, you will need to update the DNS settings to point the domain to your GoDaddy hosting account.
You will find their instructions on how to do this, or you can reach out to their support team for assistance.
4. Create A Backup
Before proceeding with any installation or modification, it’s always advisable to create a backup of your website. GoDaddy has many backup options, and you can either built-in traffic tool or install a WordPress backup to ensure that you have a copy of your website’s database and files. So, with GoDaddy, you are in good hands. Refrain from getting tensed about losing data.
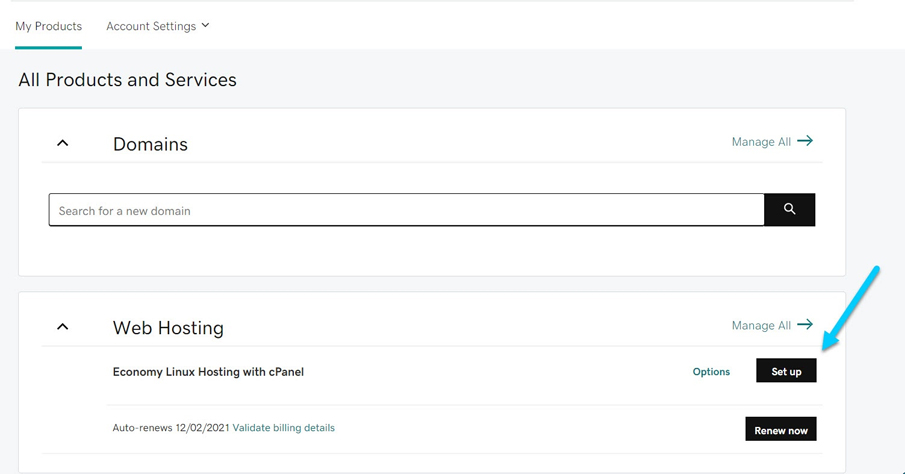
5. Install WordPress Via GoDaddy Hosting Dashboard
GoDaddy provides a straightforward way to install WordPress through its hosting dashboard. Log in to your GoDaddy account, go to the hosting section, and find the “WordPress”, or “Managed WordPress” option.
Follow all the screen prompts to set up your WordPress installation. You will need to choose a domain, provide a name for your site, set up a username and password for your WordPress admin account, and select any additional options offered during the installation process.
6. Secure Your Installation
WordPress security is crucial to safeguard your website from potential threats. After you install WordPress, it’s recommended to take some basic security measures.
Change the default admin username to something unique, use a strong password, and keep your WordPress installation, themes, and plugins up to date. Additionally, you may consider installing a security plugin, such as Wordfence or Sucuri, to further enhance the security of your WordPress site.
7. Customize And Enhance Your Website
After successfully installing WordPress on GoDaddy, you can start customizing your website and choose a suitable theme that aligns with your brand or desired website layout.
Install essential plugins for SEO optimization, contact forms, caching, and other functionalities you may require. Explore the WordPress dashboard to familiarize yourself with various settings and options available for customization.
How To Install WordPress On GoDaddy?
Ever since the hosting platforms became popular and a large number of businesses are going online, the query, “How to install WordPress on GoDaddy,” became more common.
There isn’t a single path to start with WordPress are a few ways to add WordPress to GoDaddy, and below we have discussed all of them.
Check out the guide to know how to host a WordPress website on GoDaddy and do it right away.
Purchase Hosting And Domain Name
When it comes to building a website, purchasing a hosting plan and a domain name are essential first steps. A hosting plan provides server space to store your website’s files and make them accessible online.
On the other hand, a domain name gives your site a unique web address. In this guide, we will walk you through the process of purchasing and hosting a domain name on GoDaddy, ensuring you have a solid foundation for your online presence…
1. Visit GoDaddy
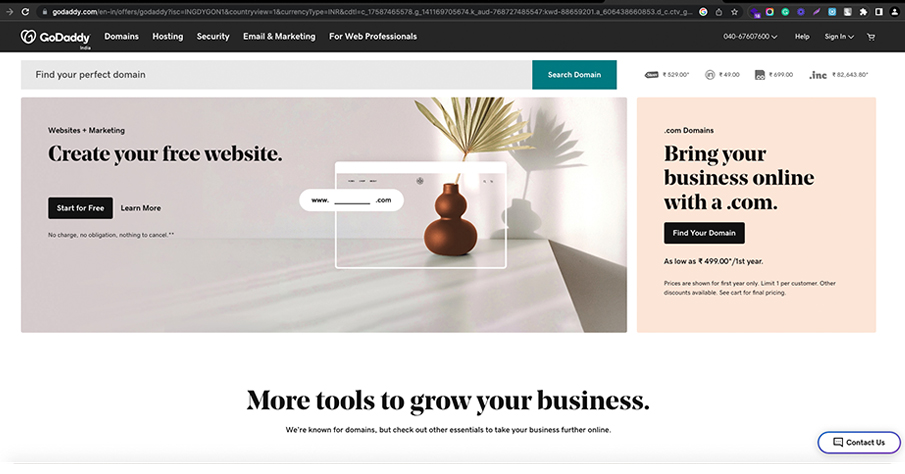
This is the first and very basic step of this GoDaddy WordPress tutorial. Visit the official website of GoDaddy or simply type www.GoDaddy.com in the URL box. You will be redirected in a second.
2. Select Hosting & SSL
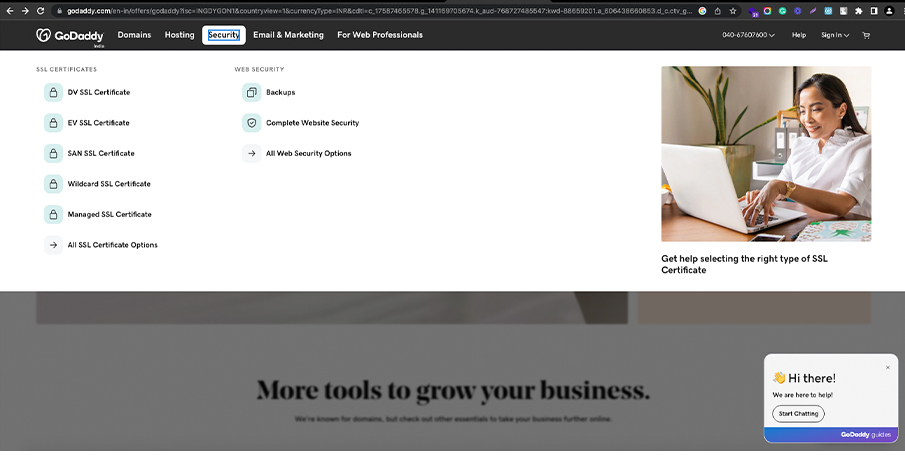
On the homepage, look for the “Hosting & SSL” section. You can also navigate to the “Hosting” menu to get more options on hosting and SSL certificates for your website.
3. Select Web Hosting
A set of options will be available to you. From there select “Web Hosting,” This will lead you to the hosting packages GoDaddy offers. There is a range of hosting plans offered by GoDaddy having some great benefits.
4. Pick A Hosting Package

Review the different hosting packages available and choose the one that best suits your needs. Take into account the factors before you finalize one, such as bandwidth, storage, and features provided. You may compare and contrast GoDaddy’s packages with other providers’ options to make sure this is the right one for you.
5. Select A Term Length
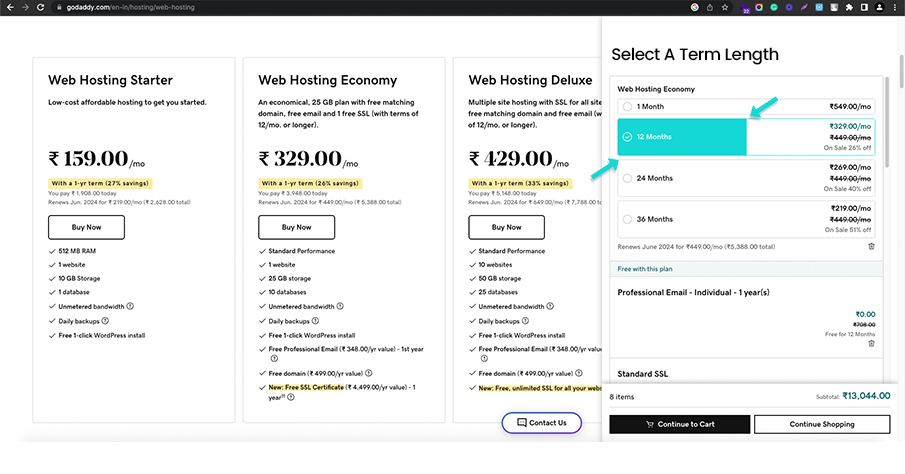
Once you have selected a hosting package, click on it to proceed. You will then be presented with options to choose the term length for your hosting plan. Select the duration you prefer, whether it’s monthly, yearly, or another term offered.
6. Select The System Type: Linux With Cpanel Control Panel
Next, you will need to choose the system type. In this case, select “Linux with cPanel Control Panel”, as your system type. This configuration is commonly used and offers a user-friendly control panel for managing your hosting account.
7. Add Protection If Needed

If you require additional protection for your website, such as an SSL certificate or website security, you may explore and select the relevant options. This step is although optional, recommended for securing your website and protecting user data.
8. Add Your Domain Name
After configuring the hosting package and any additional protection, you will add to your domain name. If you already have a domain name registered with GoDaddy, select it from the dropdown list. Otherwise, you can choose to register a new domain name by typing it in the provided field.
9. Make Your Purchase
Finally, take a look at your purchase summary, which includes the hosting package, term length, any additional protection, and domain name. Once you are satisfied, proceed to make your purchase by clicking on the appropriate button or link.
Installing WordPress Manually On GoDaddy Via Cpanel
Installing WordPress manually on GoDaddy via cPanel gives you more control over the setup and customization of your website. By following a few straightforward steps, you can have WordPress up and running on your GoDaddy hosting account.
This GoDaddy WordPress tutorial is going to answer how to install WordPress in GoDaddy cPanel. Follow the steps to do it manually.
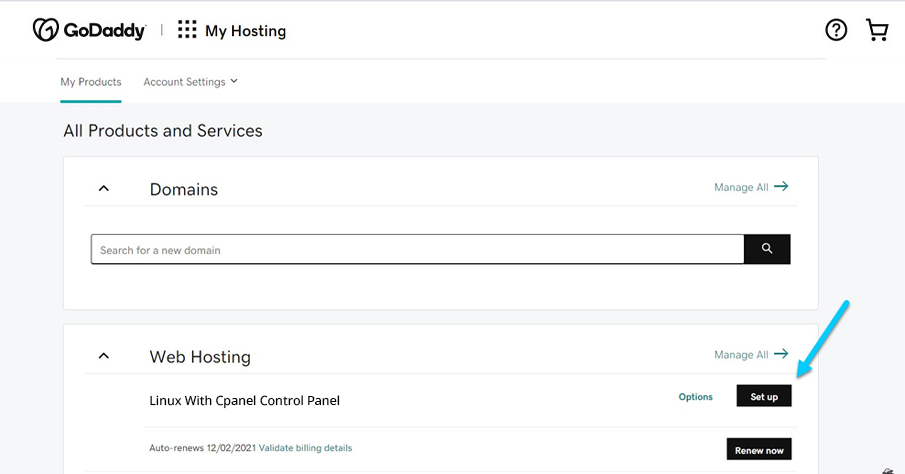
Step 1 – Go Back To Manage
As the first step to install WordPress manually on GoDaddy via Cpanel, go back to the “Manage”, section of your GoDaddy account related to your hosting package.
Step 2 – Cpanel
Now locate and access cPanel. This is the control panel used to manage your hosting account. Look for the cPanel icon or link and click on it.
Step 3 – Navigate To WordPress
Once in cPanel, navigate to the “WordPress” section. It might be listed under the “Applications”, or “Software” Category.
Step 4 – Install The Application
In the WordPress section, click on the “Install”, or “New Installation” button to begin the installation process.
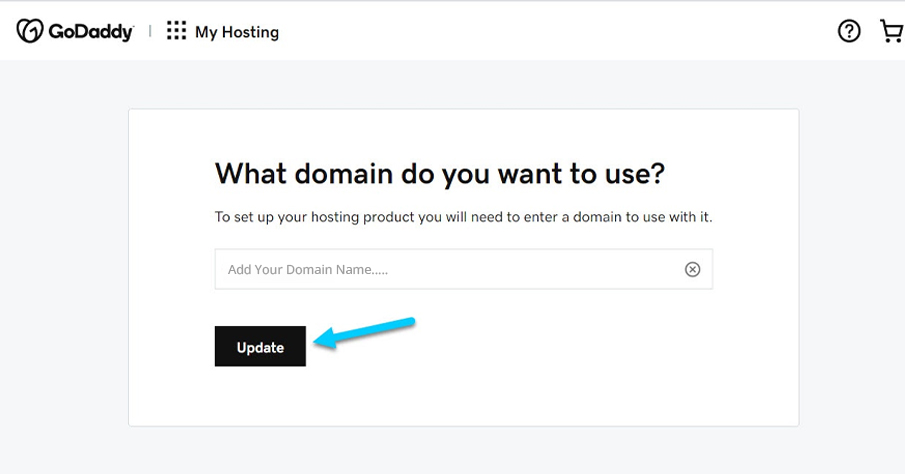
Step 5 – Select HTTPS
Configure the installation settings. You will be prompted to provide details such as the domain or subdomain where you want to install WordPress. Make sure to pick the right domain from the dropdown list. Additionally, choose whether you want HTTPS to be used by your site. We recommend it for secure connections.
Step 6 – Note Down The Username And Password
Note down the username and password that will be generated for your WordPress installation. These credentials will be used to log in to your WordPress dashboard.
Step 7 – Install WordPress
Note the username and password down that will be generated for your WordPress installation. These credentials will be used to log in to your WordPress dashboard.
Step 8 – Login To WordPress
Proceed with the installation by clicking on the “Install”, or “Submit” button. cPanel will then begin installing WordPress on your selected domain.
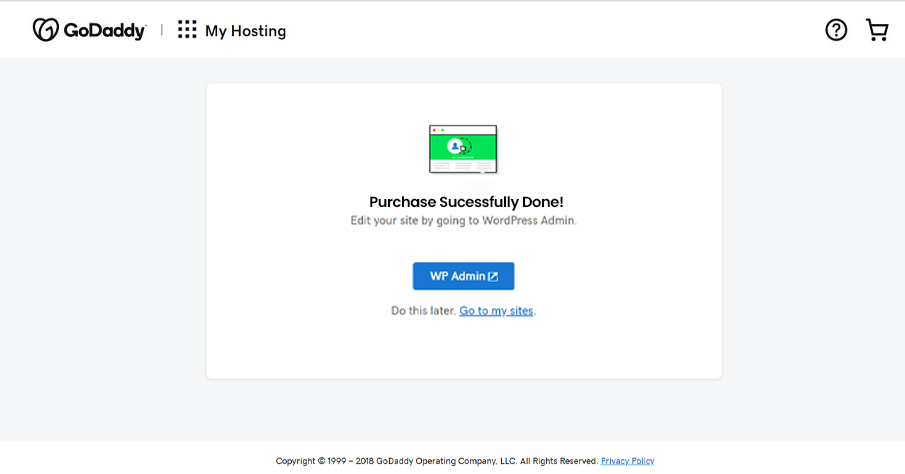
Step 9 – Go Back To Dashboard
Wait for the installation to complete, this process may take a few moments. Once finished, you will see a success message or notification indicating that WordPress has been successfully installed.
Install WordPress Or Other Applications In My Windows Hosting Account
WordPress is by far one of the most website-building tools – and learning only how to set up WordPress on GoDaddy sounds like you are missing out on something more.
Did you know you can set up WordPress or other applications in your My Windows Hosting Account?
No?
Okay, now you know it, and here’s how to do it…
Step 1
Log in to your Windows hosting account control panel. GoDaddy typically uses Plesk as the control panel for Windows hosting accounts. Use your provided username and password to access the control panel.
Step 2
Once logged in, you will see a dashboard or main page with various sections and options. Look for the “Applications”, or “Web Applications” section. In Plesk, you can usually find this under the “Web Applications & Sites”, tab.
Step 3
Within the Applications section, you will find a list of available applications that can be installed. Look for the specific application you want to install, such as WordPress, Joomla, Drupal, etc. In Plesk, these applications are often categorized under “Featured Applications”, or “Popular Apps.”
Step 4
Click on the application you want to install. You will be directed to a new page or a pop-up window with installation details and options.
Step 5
Review the installation details. Make sure to read any provided instructions or documentation for the application. Pay attention to any prerequisites or system requirements mentioned.
Step 6
Configure the installation settings. You may be asked to provide information such as the installation location, domain or subdomain to install the application on, administrator username, and password. Fill in the required details accordingly.
Step 7
Customize any additional options available. Depending on the application, you may have the option to specify database and website settings or choose additional features to install. Adjust these options according to your preferences.
Step 8
Verify the installation details. Double-check the installation directory, database settings, and any other configuration options you have chosen. Ensure they are accurate and suitable for your needs.
Step 9
Initiate the installation process. Look for a button or link that says something like “Install”, or “Start Installation.” Click on it to begin the installation.
Step 10
Wait for the installation to complete. The time required for installation may vary depending on the application and your hosting environment. During this process, the installer will create the necessary databases, configure files, and set up the application for use.
Step 11
Once the installation is finished, you will receive a confirmation message or notification. It may provide information about the successful installation and the URL, where you can access the application.
Step 12
Access your newly installed application. Open a web browser and visit the domain or subdomain associated with the installed application. For example, if you installed WordPress on your primary domain, you can access it by typing, “www.yourdomain.com” in the browser’s address bar.
Installing Older Versions Of WordPress
While it’s generally recommended to use the latest version of WordPress for security and compatibility reasons, there may be situations where you need to install an older version. Whether it’s for testing purposes or to maintain compatibility with specific themes or plugins, here is the process involved in installing older versions of WordPress:
1. Downloading the WordPress .zip package
You first need to download the WordPress .zip package. For that, you have to go to the official WordPress website (wordpress.org) and navigate to the “Download” section. Look for the specific version you want to install and download the corresponding .zip package to your computer.
2. Connect FileZilla to your hosting
After downloading the WordPress .zip you need to connect to your hosting. FileZilla is an FTP (File Transfer Protocol) client that allows you to connect to your web hosting server. Launch FileZilla and enter your FTP credentials (hostname, username, password, and port) provided by your hosting provider to establish a connection.
3. Upload WordPress .zip file to Windows Hosting
In the FileZilla interface, locate the directory on your server where you want to install WordPress. This is usually the root directory or a subdirectory within it. On the local computer side, navigate to the location where you downloaded the WordPress .zip file.
Select the file and drag it to the appropriate directory in FileZilla to initiate the upload.
This will take only a few minutes.
4. Unzip the WordPress .zip file
Once the WordPress .zip file is uploaded to your server, you need to unzip it. Most hosting providers offer a built-in file manager in their control panel. Use the file manager to select the WordPress .zip file and extract its contents. This will create a folder containing the WordPress files.
5. Choose files by opening the unzipped WordPress
Locate the folder that was created after extracting the WordPress .zip file. Open this folder to view its contents and check it thoroughly. Inside, you will find various files and directories related to WordPress.
6. Click and drag the files to the WordPress root directory
Return to FileZilla and navigate to the directory where you want to install WordPress.
Select all the files and directories from the unzipped WordPress folder and drag them to the root directory on your server. This will copy the files to the appropriate location where you can access them easily.
7. Create a MySQL user and database for your website
Access your hosting control panel and find the section for managing databases.
Create a new MySQL user and assign it a secure password. Then, create a new MySQL database and associate the user with it. Note down the database name, username, and password as you will need them during the WordPress installation process.
8. Set up the installation
Open a web browser and navigate to the domain or subdomain where you uploaded the WordPress files. You should see the WordPress installation page, prompting you to choose a preferred language and enter all the database information.
9. Tap on “run the installation” and fill in the website information
Enter the required information, including the site title (WordPress site’s title), username, password, and email address (for notification purposes). This information will be used to create the administrator account for your WordPress site.
10. Click “Install WordPress”
After filling out the necessary information, click the “Install WordPress” button to begin the installation process. WordPress will then set up the database and complete the installation. And you’ll complete the whole process within minutes.
These were a few steps to install an old version of WordPress. If you still have doubts, find tutorials online or ask experts to guide you.
How To Install SSL For Free On GoDaddy WordPress?
To install SSL for free on GoDaddy WordPress, you can use Let’s Encrypt, a widely trusted and free SSL certificate provider. We’ll help you through the process:
1. GoDaddy account login and access WordPress hosting-
Go to GoDaddy’s official website and log in to your account using your credentials. Once logged in, navigate to the account’s dashboard. Find and select the Hosting” option. This will take you to the hosting management page.
2. Open the cPanel
Look for the cPanel section on the hosting management page. Click on the “cPanel Admin”, or a similar option to access the cPanel control panel. Inside the cPanel, locate the section labeled “Security.”
The specific placement and arrangement of sections may vary, but the security section typically contains the necessary tools for managing SSL certificates.
3. Find and open the SSL/TLS Manager
Within the Security section, you should find an option called “SSL/TLS Manager”, or something similar. Click on it to open the SSL/TLS management interface. Inside it, look for the “Certificates (CRT)” option. Click on it to proceed.
4. Generate a new certificate, fill and submit it
On the Certificates page, you’ll see the option to “Generate, view, upload, or delete SSL certificates.” Click on the “Generate” button to request a new SSL certificate. In the SSL Certificate Generation form, you’ll need to provide the necessary information.
Enter your domain name (or subdomain) in the appropriate field. Leave the other settings as their default values. After filling in the details, click on the “Request Certificate” button to submit the certificate request.
5. Verify domain ownership
The verification of domain ownership is important. GoDaddy will automatically verify your domain ownership. The process may vary depending on your hosting setup, but it usually involves confirming the request via email or adding a TXT record to your domain’s DNS settings. Follow the provided instructions carefully to complete the verification.
6. Download the SSL certificate
Once your domain ownership is verified, you’ll be able to download the SSL certificate. Locate the certificate in the SSL/TLS Manager and click on the “Download” button. Save the certificate file to your computer.
7. Install the SSL certificate in cPanel
Return to the SSL/TLS Manager in cPanel and find the “Install and Manage SSL for your site (HTTPS)” section. Then, click on the “Manage SSL Sites” option.
On the next page, find the domain or subdomain you want to secure with SSL.
Click on the “Browse” button next to the “Certificate (CRT)” field and select the certificate file you downloaded earlier. Then, click the “Install Certificate” button to install the SSL certificate.
8. Verify SSL installation
After the SSL certificate is installed, you can verify the installation by visiting your website using “https” instead of “HTTP”. Your site should now load with a secure connection.
By following these steps, you should be able to successfully install a free SSL certificate on your GoDaddy WordPress site.
Let’s Encrypt your GoDaddy WordPress site. Remember to regularly renew your SSL certificate to ensure continuous security for your website. If you still feel confused, you can look for GoDaddy WordPress tutorials online to guide you.
Ready To Install WordPress On GoDaddy?
In conclusion, Installing WordPress on GoDaddy is a pretty straightforward process. This allows you to create a dynamic and feature-rich website with ease.
By following the step-by-step instructions on how to install WordPress on GoDaddy outlines above, you can set up your website quickly. We hope that now that at this moment, you are ready to unleash the full potential of this robust content management system.
With WordPress’s extensive range of themes, plugins, and customization options, combined with GoDaddy’s reliable hosting infrastructure, you can create a website that stands out and meets your unique requirements. Leverage the power of WordPress with GoDaddy’s hosting capabilities to build a robust online presence for your business.
At Webskitters Technology Solutions, we understand the importance of a seamless and hassle-free website installation process. Our team of experts can assist you in installing WordPress on GoDaddy and help you optimize your website for seamless performance.
Whether you need a simple WordPress blog, an Ecommerce store, or a complex corporate website, we have the expertise to tailor WordPress to your specific needs.
Reach out to our expert team today to explore our comprehensive and cost-effective WordPress development services. Start your WordPress installation journey today with Webskitters and unlock the full potential of your online presence.
Frequently Asked Questions
1. How To Open WordPress In GoDaddy?
Here is a quick method of how to install WordPress on GoDaddy when you purchase a new hosting plan:
- Sign in to your GoDaddy account.
- Go to My Account.
- Click the button “Set Up.”
- Enter the Domain Name.
- Select The Data Center.
- Install a new WordPress website.
- Create a WordPress user by using your username and password.
- Pause until the progress bar vanishes.
- Click on Go to Dashboard on the next screen.
- You may get an error that happens when you own a domain from any other registrar.
- Put GoDaddy’s name servers to your domain registrar.
- Copy all the name servers as there is no fixed or specific name server, unlike other hostings.
- Put the copied name servers from the DNS management of GoDaddy and paste them to the domain registrar.
- Sit back for a while and let the DNS propagation happen.
- Refresh your website after you have waited and take a look at your newly installed WordPress.
- Login to your WordPress by entering your username and password.
- You may select a starter template, however, if you are interested in getting a WordPress theme, click “Exit To WordPress dashboard.
2. Do I Need Any Technical Skills To Install WordPress On GoDaddy?
Not necessarily! The installation procedure is pretty straightforward and doesn’t require technical skills. The procedure only takes a few minutes to complete. However, there are some technical terms that you may come across while installing WordPress on GoDaddy.
If you have technical knowledge, it’s an added advantage, but, if you don’t that will not cause a hindrance to your installation.
3. How Long Does It Take To Install WordPress On GoDaddy?
To install WordPress on GoDaddy it takes only a few minutes. Purchasing a domain name and then subscribing to one of the company’s paid hosting plans is all you need to do.
Nevertheless, in some rare cases, you may have to wait from a few seconds to some hours considering your country’s location as well as the domain registrar’s popularity.
4. Is The Process Free?
On GoDaddy, WordPress itself is free. Nevertheless, it comes with a hosting plan which comprises monthly and annual fees. You have to pay for domain registration and website hosting. All the details about the payment are there on the GoDaddy website.
5. Does GoDaddy Have A WordPress Plugin?
GoDaddy has developed several plugins for the content management system, WordPress. Each of them has its own support and information pages hosted at WordPress.org. There are a description, reviews, and download links on these information pages. For every plugin out there, you will find a link to the support forest.

 UI/UX Design
  Web Development
  Mobile App Development
  Internet Of Things
  Game Development
  Artificial Intelligence
  Digital Marketing
  Data Science Consulting